Backdrop Box - The Coolest Way to Display Your Minis!
Introducing Backdrop Box
I’ve fallen down the delightful rabbit hole of painting minis. After painstakingly finishing tiny dragons and heroic warriors I realized something tragic… They were just sitting on my desk, surrounded by coffee mugs and charging cables. Hardly the epic display their adventures deserved!
Enter my shiny new Bambu Labs P1S. It’s a huge upgrade from my old Ender 3 Pro and an amazing Christmas gift from my Mother-in-Law (thanks Paula!). With a sleek new printer and a spark of inspiration, I decided it was time to give my minis the home they deserved.
I stumbled across a “display case contest” and the challenge was irresistible. Thus, the Backdrop Box was born. I totally thought I could finish this in an afternoon. Spoiler: I was hilariously wrong.
This thing pushed me to my limits. My original plan was to create something folks could tweak and use for themselves. If you have a 5th generation iPad Mini, you’re in luck! Otherwise? I think you’ll be able to tweak the design, but I make no guarantees.
This guide is for the brave souls who want to try making their own Backdrop Box. Before you begin though, I suggest watching the video. You really need to understand the journey of how I got here.
Stuff I Used
I have provided links to the stuff I used. These are affiliate links, but please don’t buy stuff you don’t need. Use what you have on hand.
- 3D Printer (duh!)
- Roughly 300g of your favorite filament
- An old tablet that isn’t getting used
- Tablet charging cable (I suggest a right angle cable)
- White LED Strip
- Look for pure white LED’s, not RGB White. Also make sure you get something that can be cut.
- Soldering Iron and Solder
- Heat Shrink Tubing
- Barrel Jack Connector - This is for your LED strip power supply. Confirm the size you need before buying.
- 22 AWG Wire (UL2464 )
- Mine was left over from another project and came from AliExpress.
- Wire Strippers
- Linking to this Knipex stripper because I love it. You’ll pull it from my cold, dead fingers (Not sponsored, just a fanboy).
- Super Glue
- Calipers
- A free OnShape account
Step 1: Prepare Your Tablet
Before diving into the build, let’s make sure your tablet plays nice with the Backdrop Box app. After all, there’s no sense in wasting good materials only to find out your tablet isn’t up to the task. You’ll want to download the app - it’s called Backdrop Box (big surprise, right?) - and it’s available on all the major app stores:
Yes, I even went through the effort of getting it onto the Fire Store. This would be the perfect project for a dusty old Fire tablet that isn’t being used.
Once you’ve installed the app, open it up and tap the gear icon. This lets you adjust the number of rows and columns in your display.

This will bring up a dialog box where you can tweak the layout to suit your minis.
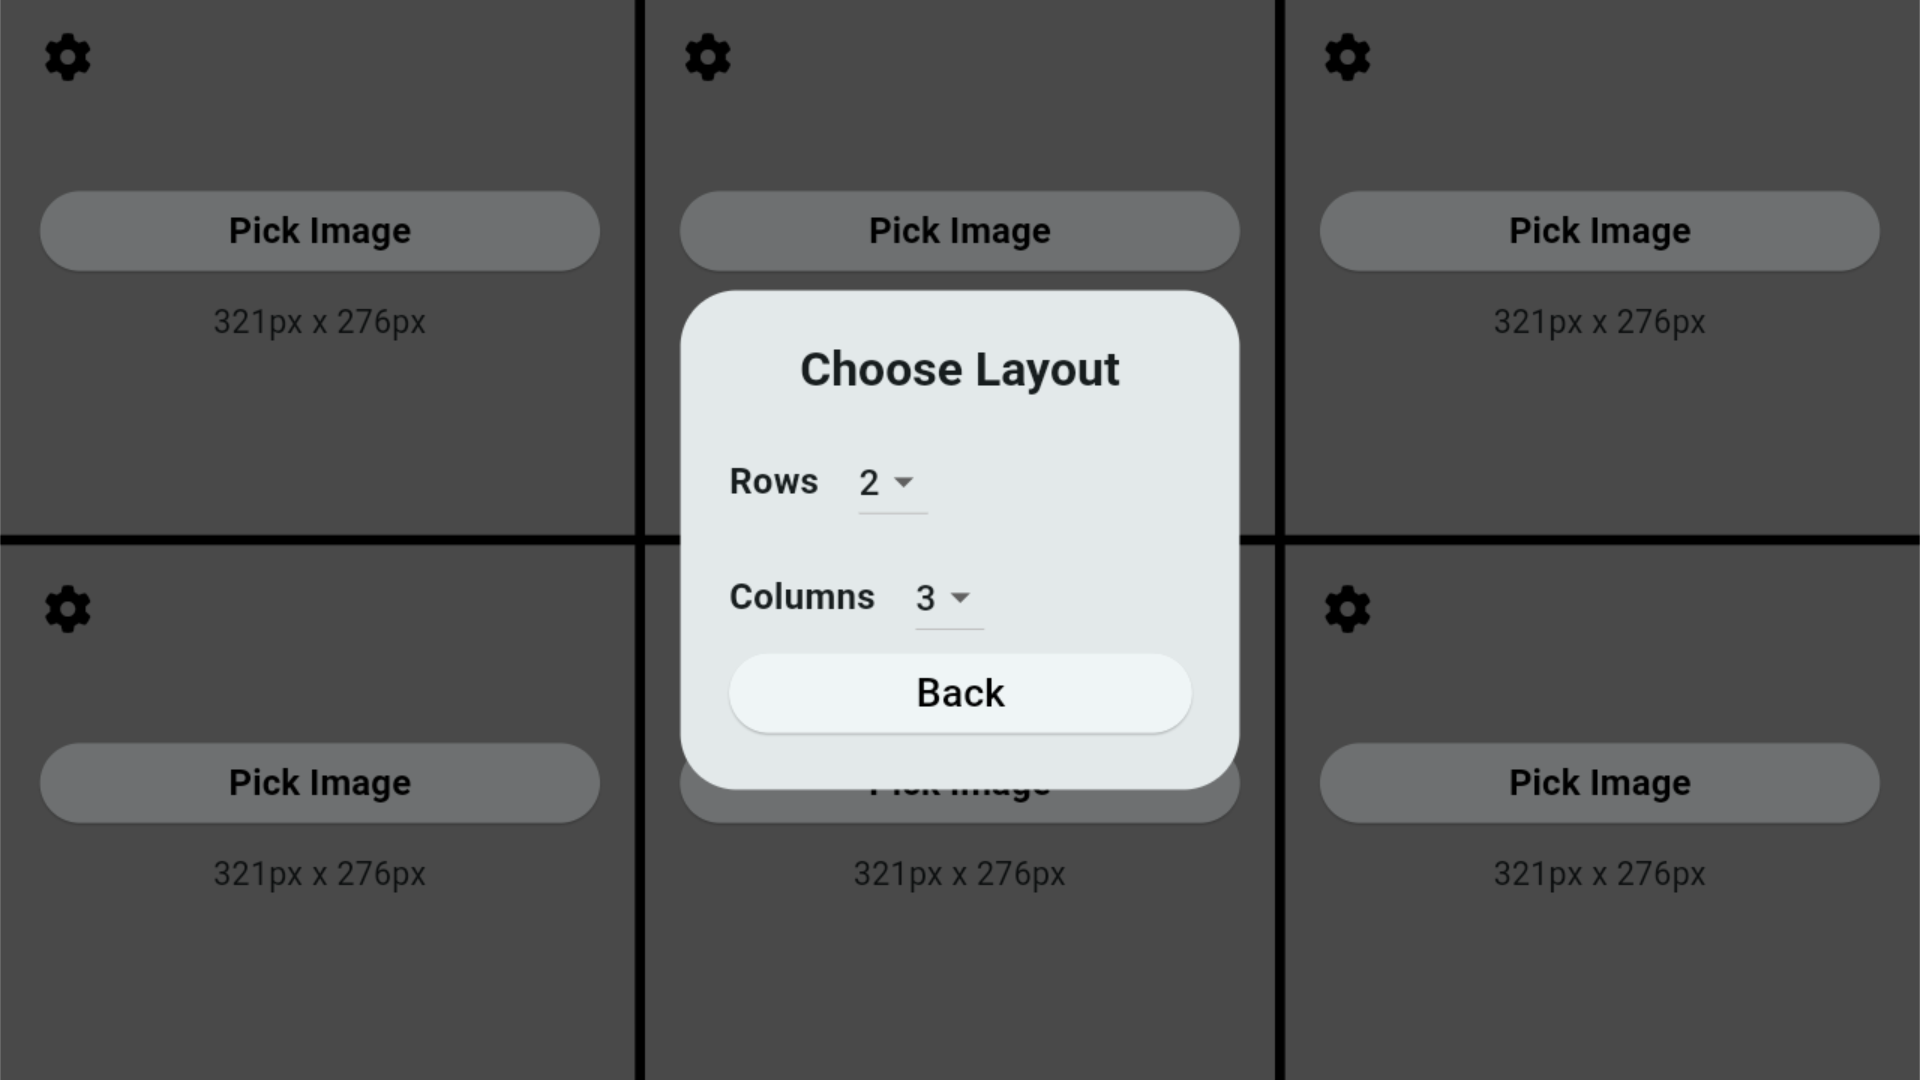
Take some time to play around with the settings until you find the perfect setup for your collection. You’ll want to settle on a layout before moving on to the next step.
If you’re using an older tablet, the crop feature might take a bit of time. Be patient and let it work its magic.
During testing, I used a 2022 Kindle Fire HD 8 with 2GB of RAM. When cropping, the back of the tablet got so hot I was concerned it might become an actual fire tablet. It worked fine though, and would totally be a viable option.
My trusty 5th gen iPad mini handled the task like a champ. That’s what I’ll be using for the rest of this project… Mainly because the Fire has already been recruited for another experiment.
Once you’re done, your app should look something like this:

Step 2: Customize the CAD Design
For this step, you’ll need a free OnShape account. I’ve done my best to keep everything parametric. Translation? You can tweak a few variables and the model should magically rebuild itself. That being said, this was my first time doing an entirely parametric design so your mileage may vary.
Sign Up for OnShape
An OnShape account is free if you’re a hobbyist and don’t mind all of your models being public. It’s completely browser based and there’s no software to download. It’s the most user-friendly CAD software I’ve ever seen.
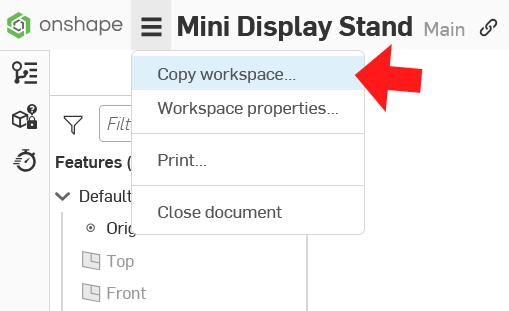
Copy the Backdrop Box Model
Now that you have an account you can open the Backdrop Box model and copy it to your account.
To do this click the hamburger icon and choose “Copy Workspace”.
Edit Variables
Once you’ve copied the model to your account, you’re ready to begin customizing. Open up the variables window on the right-hand side.

This will bring up a giant chart of variables. You can ignore many of them.
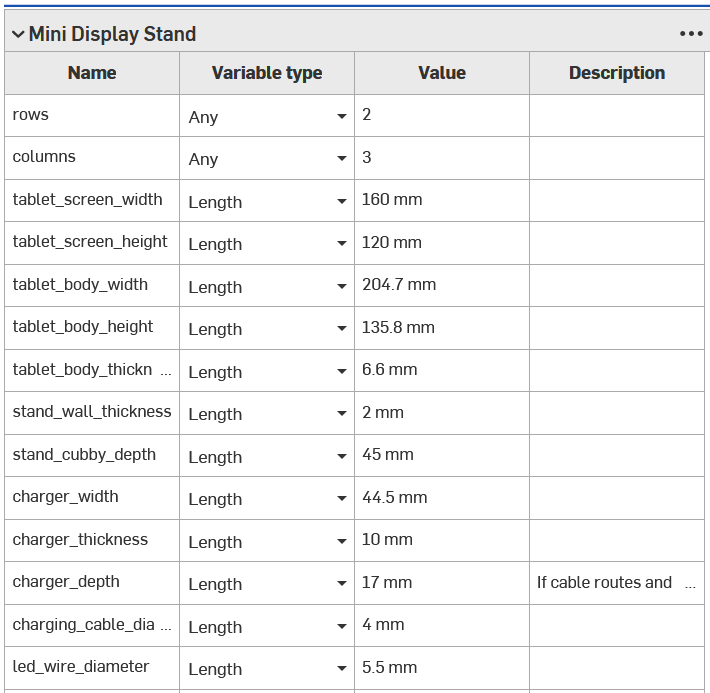
Here’s a guide to the variables you need to tweak. If you happen to be using a 5th gen iPad Mini you can leave everything as is.
The best way to get many of these dimensions is with a set of vernier calipers. If you don’t know how to use them, here’s a good YouTube video.
Tablet Dimensions
Make sure you add a bit to tablet_body_width, tablet_body_height, and tablet_body_thickness for tolerance. This will depend on your printer, but a good rule of thumb is 1mm. (Don’t add anything to tablet_screen_width or tablet_screen_height.)
tablet_body_widthtablet_screen_width
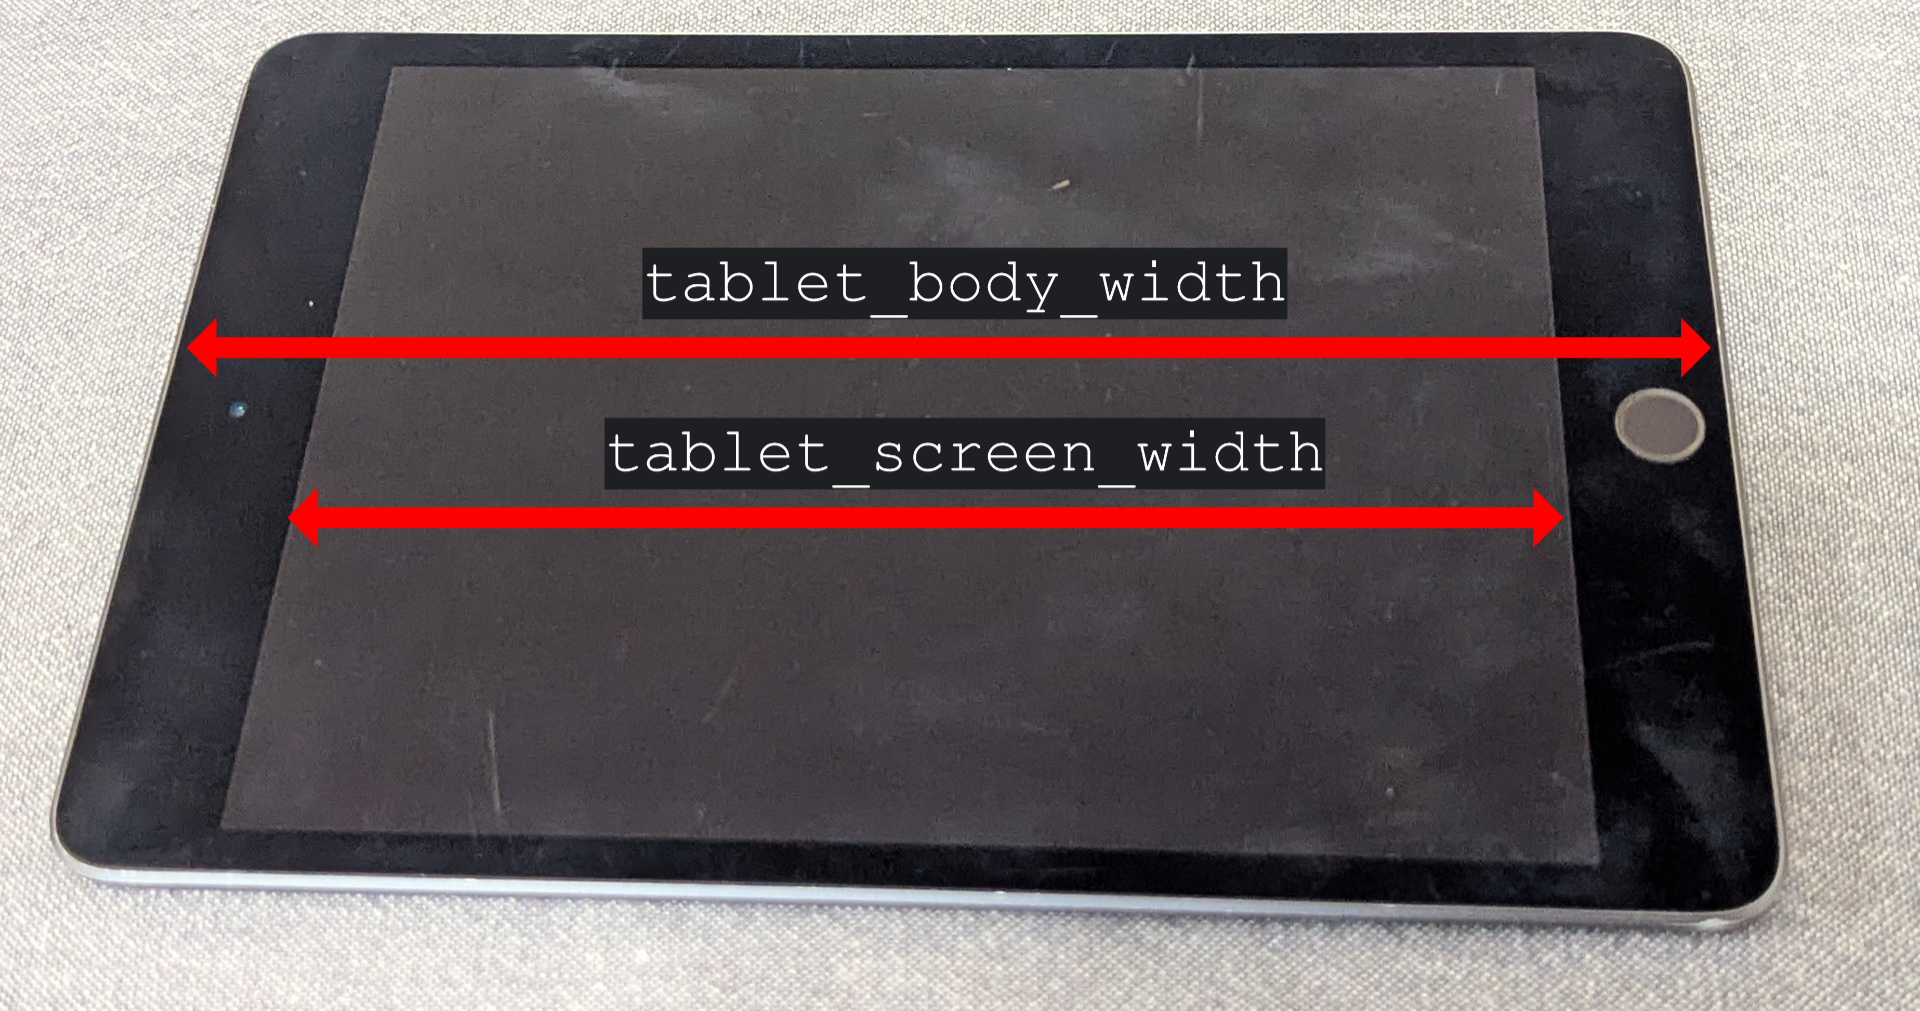
tablet_screen_heighttablet_body_heighttablet_body_thickness

Box Dimensions
Remember in the previous step when I told you to decide how many rows and columns of minis you wanted? Now is the moment where you need that information. :) This is not a measurement, but the number of boxes you want displayed horizontally and vertically.
rowscolumns

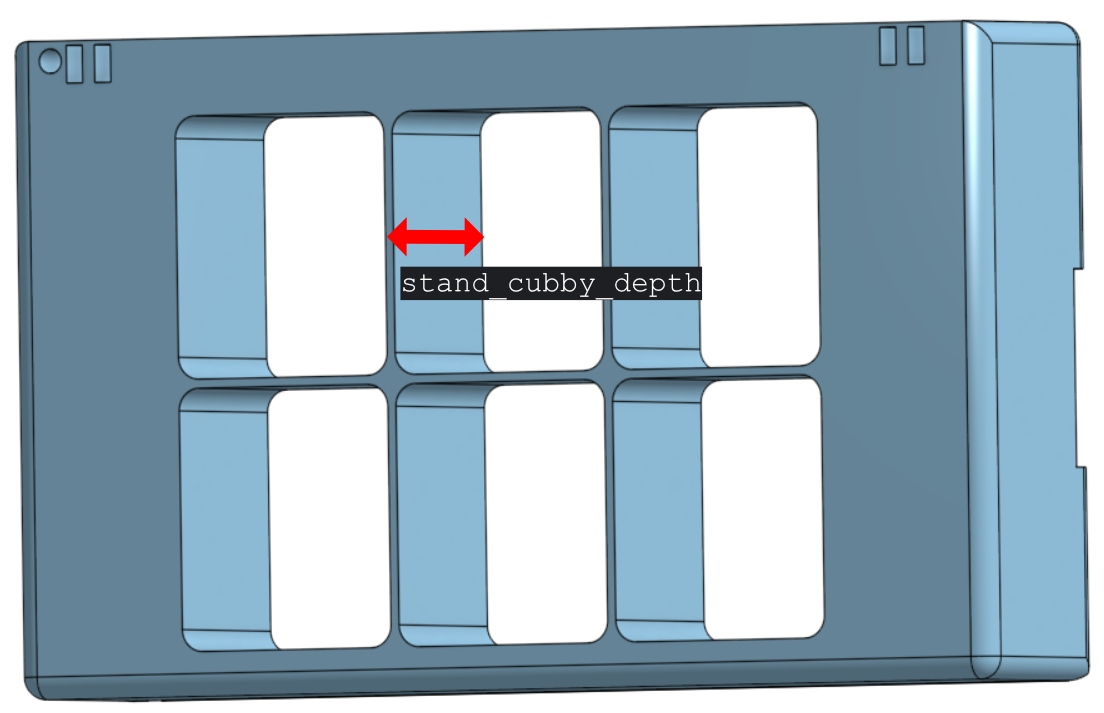
Next up is the depth of each box. This will vary depending on the type of minis you want to display. Measure the base of your largest mini with your calipers and add 2mm.
stand_cubby_depth
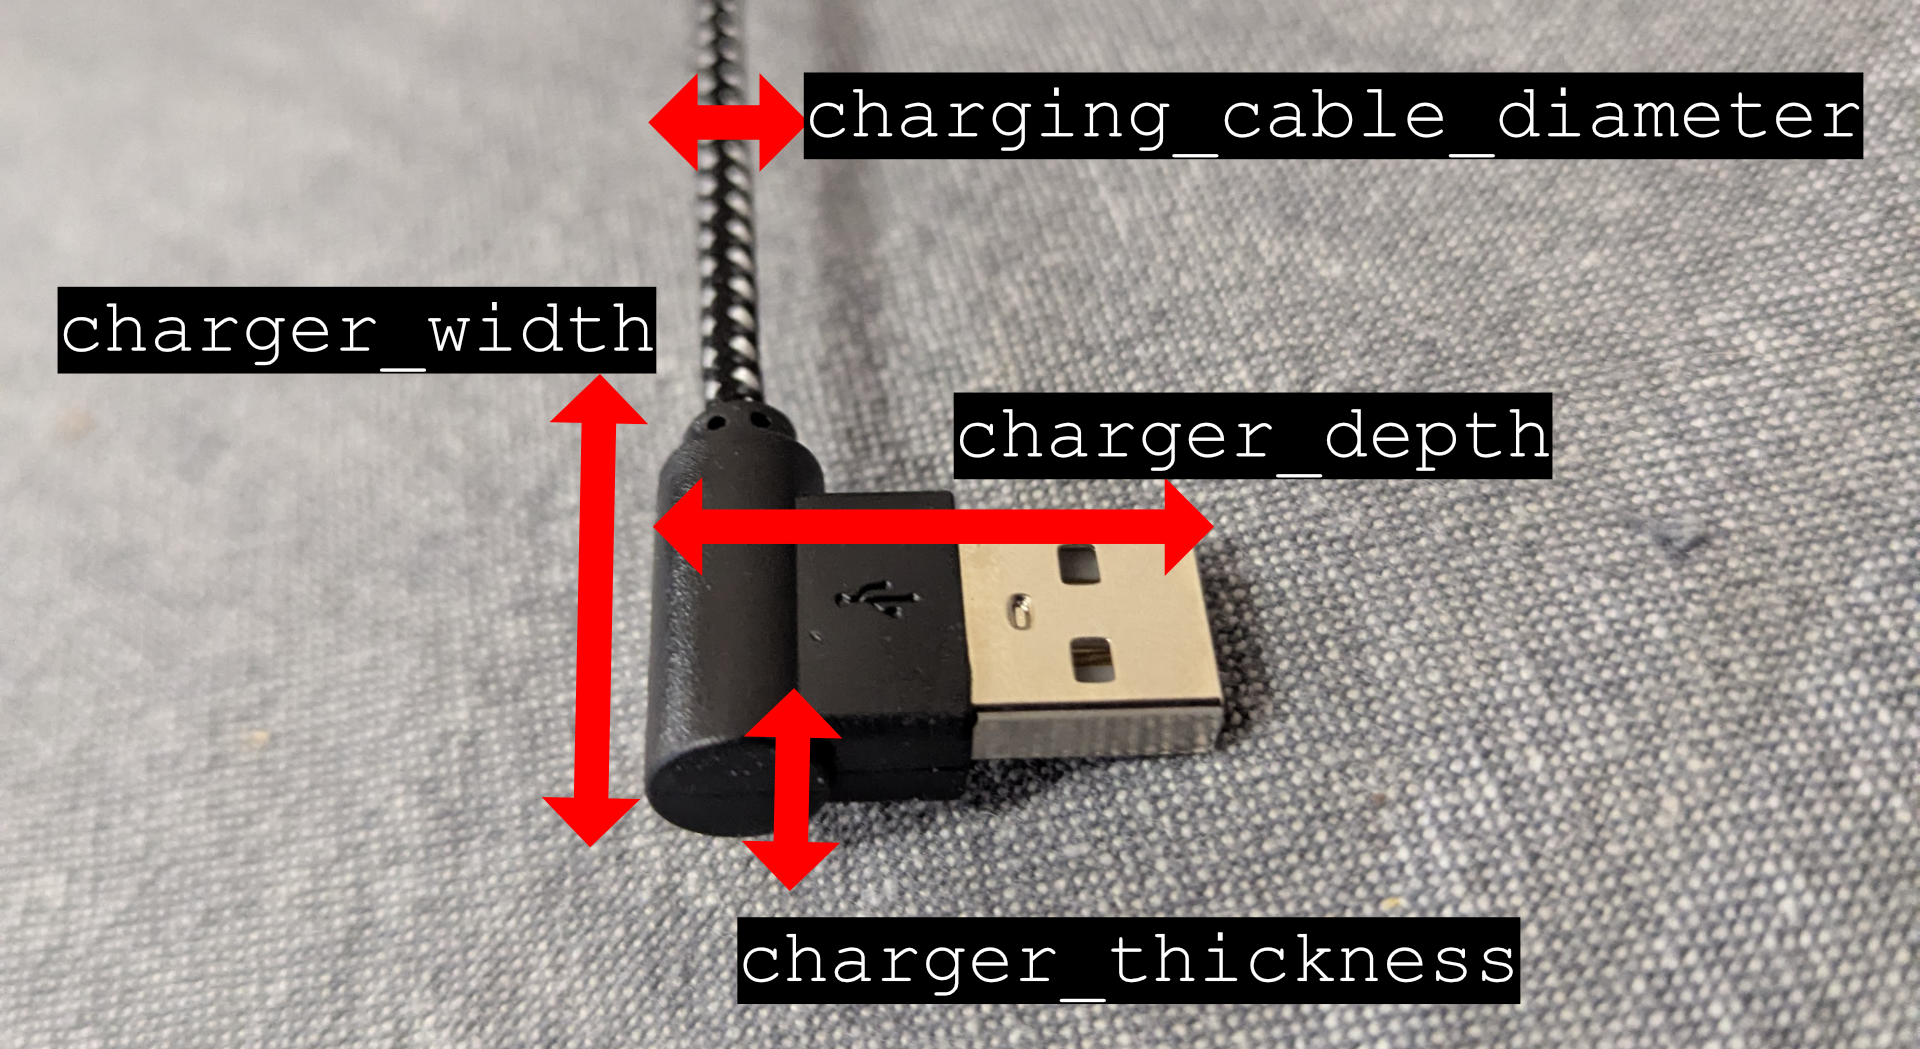
Charger Dimensions
This was by far the most difficult area to design. The model assumes the charging port is in the middle of the tablet. If this isn’t the case you’ll need to add some extra space to charger_width to compensate.
Even if the port is exactly in the middle, you’ll still want to add some space here. My actual charger is 24.5mm wide, but I had to set charger_width to 44.5 to make it fit correctly.
If you’re not sure, take your actual charger width, double it, and use that as your value.
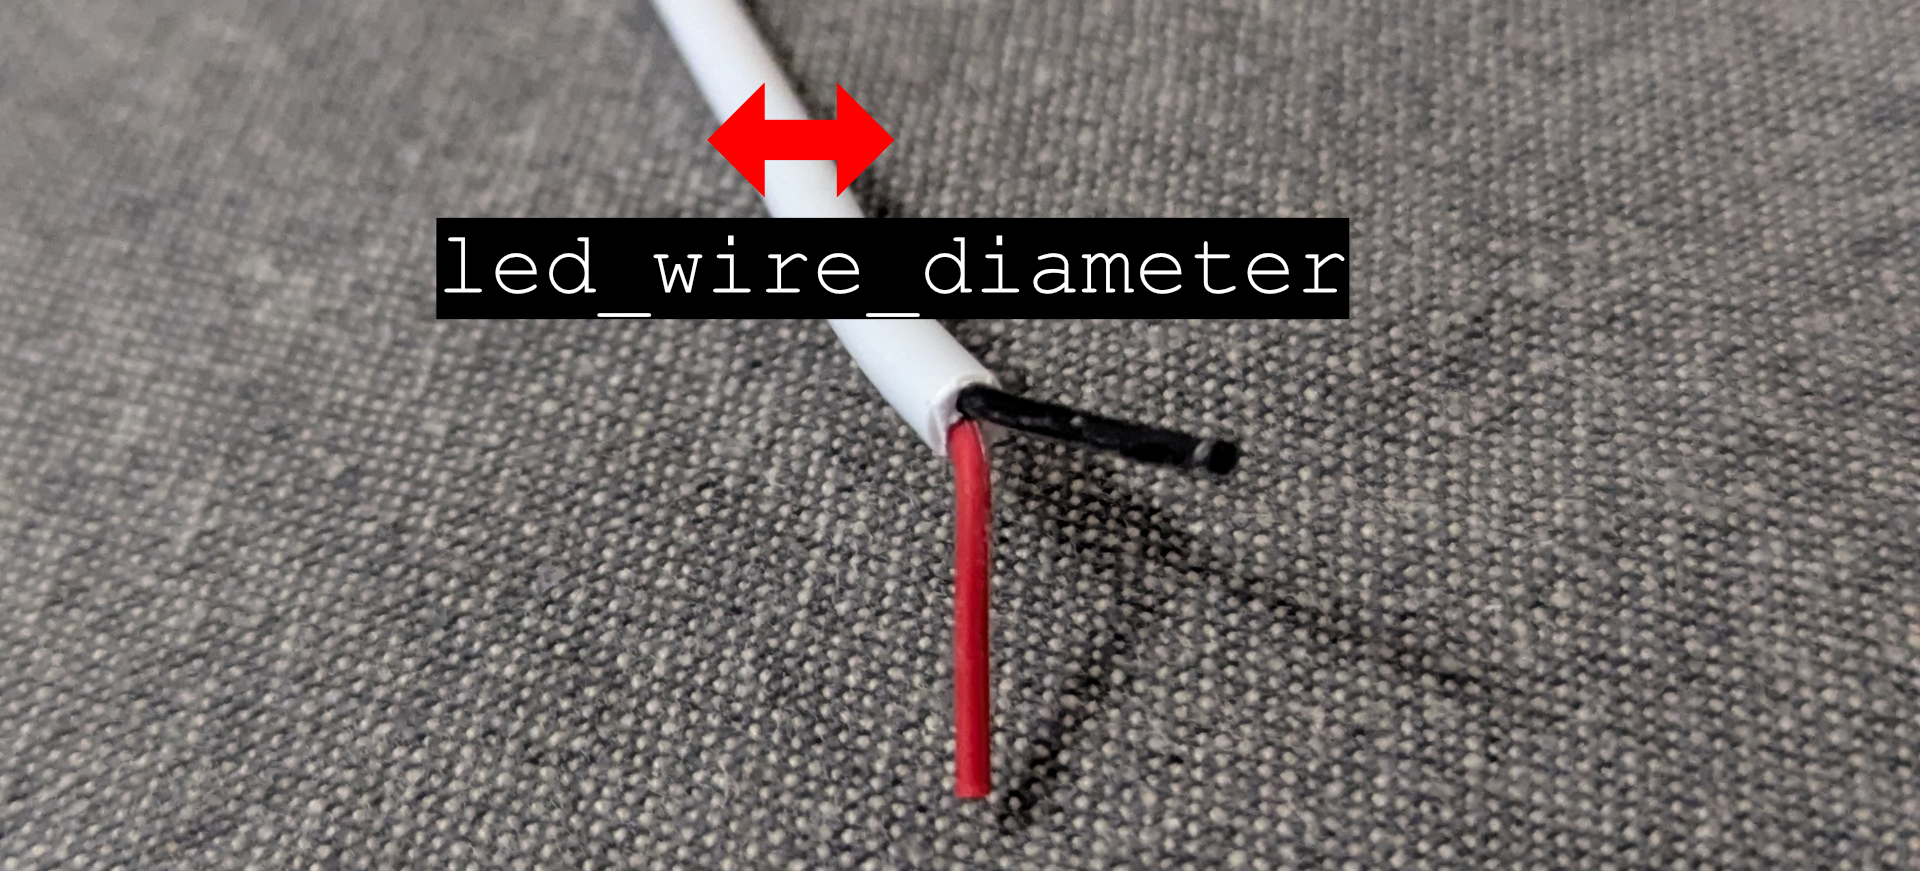
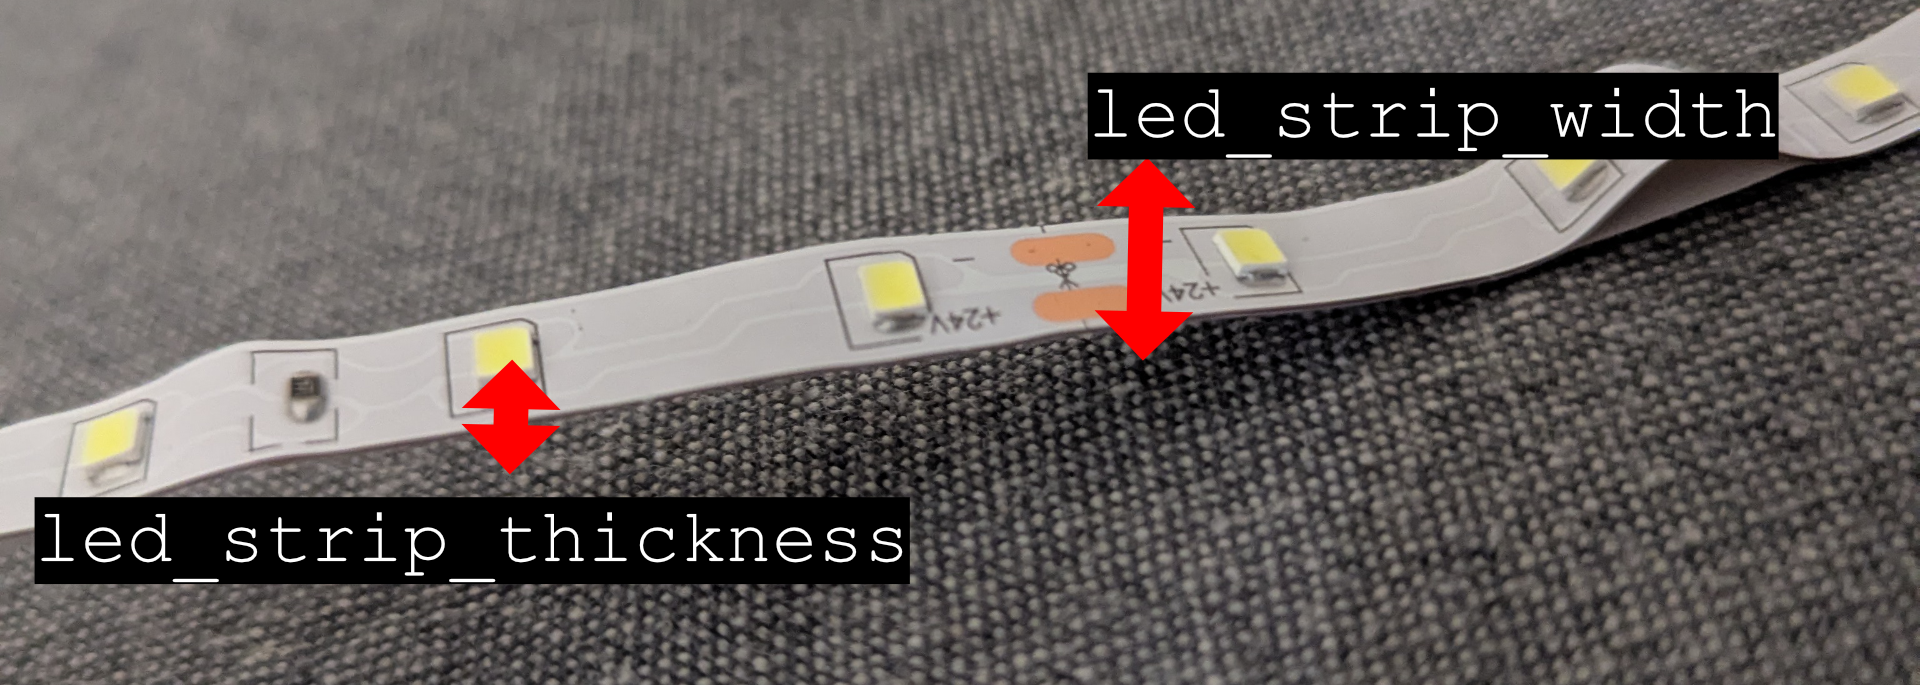
LED Dimensions
We’re almost done! The last thing we need is the dimensions of the LED lighting. Here’s those layouts:
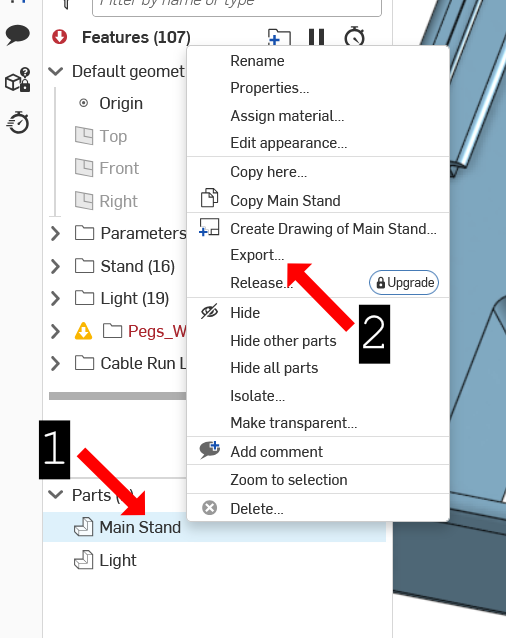
Export STL Files
At this point you’re ready to export the .stl files. To do this right-click on part in the “Parts List” and choose “Export”.
Make sure the options match the screenshot below then hit the big blue “Export” button.
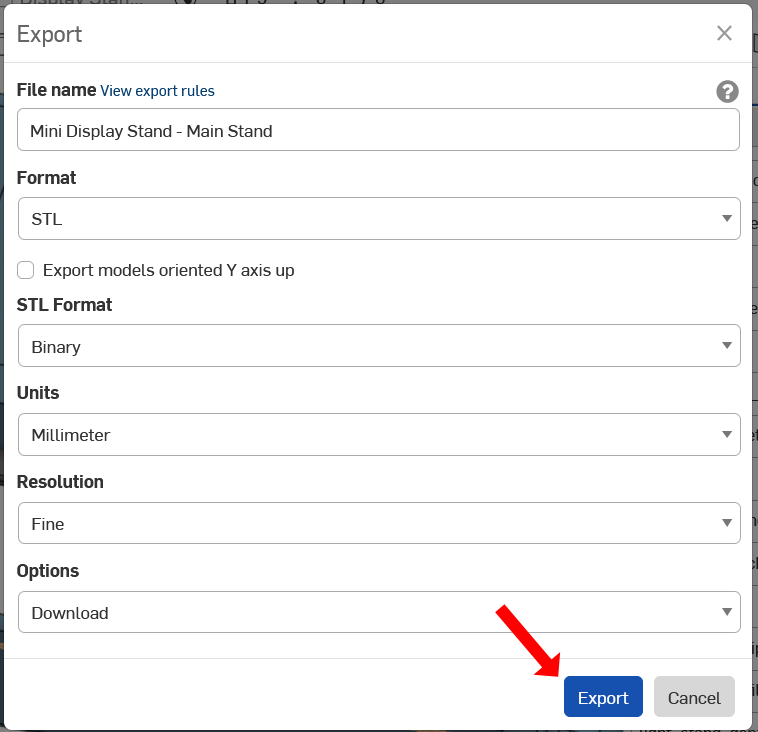
OnShape may process the files for a minute before the download begins. Once it’s finished you’ll find the files in your Downloads folder.
Step 3: Build the Box
Print the STL Files
Make sure you print one copy of the main stand and two copies of the lights.
In your slicer, orient all the parts so their front is in contact with the build plate. If you do this you shouldn’t need supports.
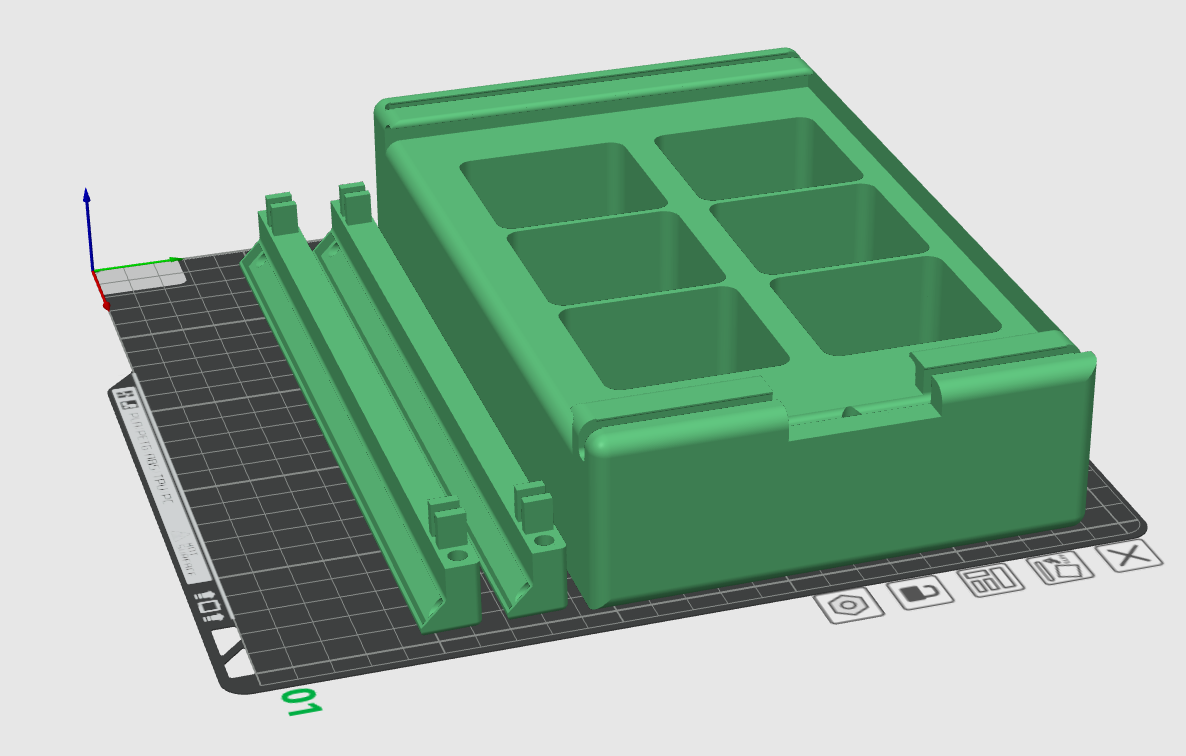
I used a 15% Gyroid infill, but you can likely use whatever infill pattern you prefer.
The pre-printing process depends on your printer and the slicer you’re using. You know your setup better than I do, so I’ll leave you to it.
Solder and Attach the LED Strips
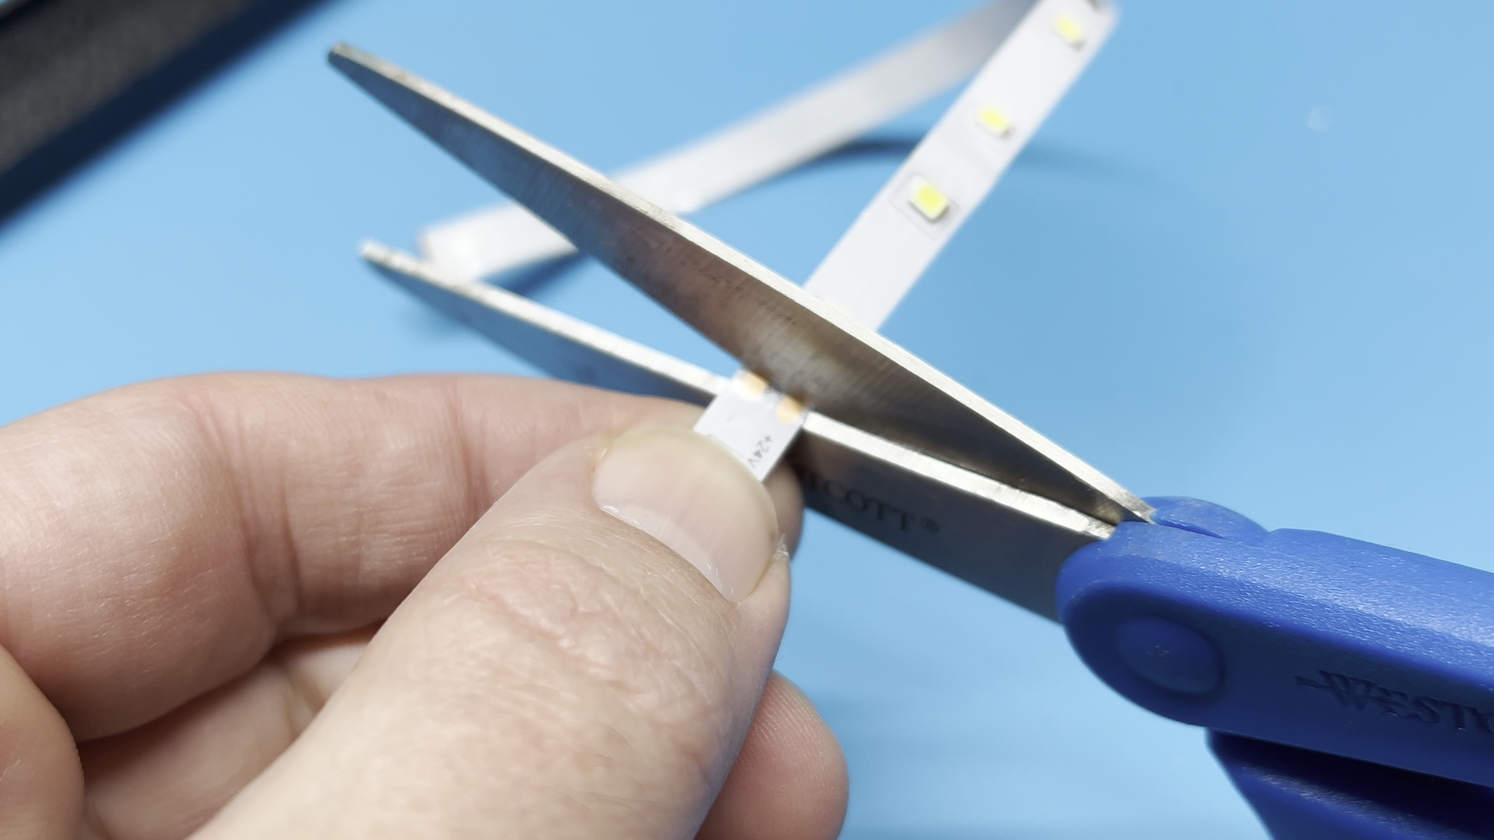
Your LED strips can be cut at specified points. Look for the cut icon and snip it down to an appropriate size. For me, that was 12 LED’s.
Start with the top light first.
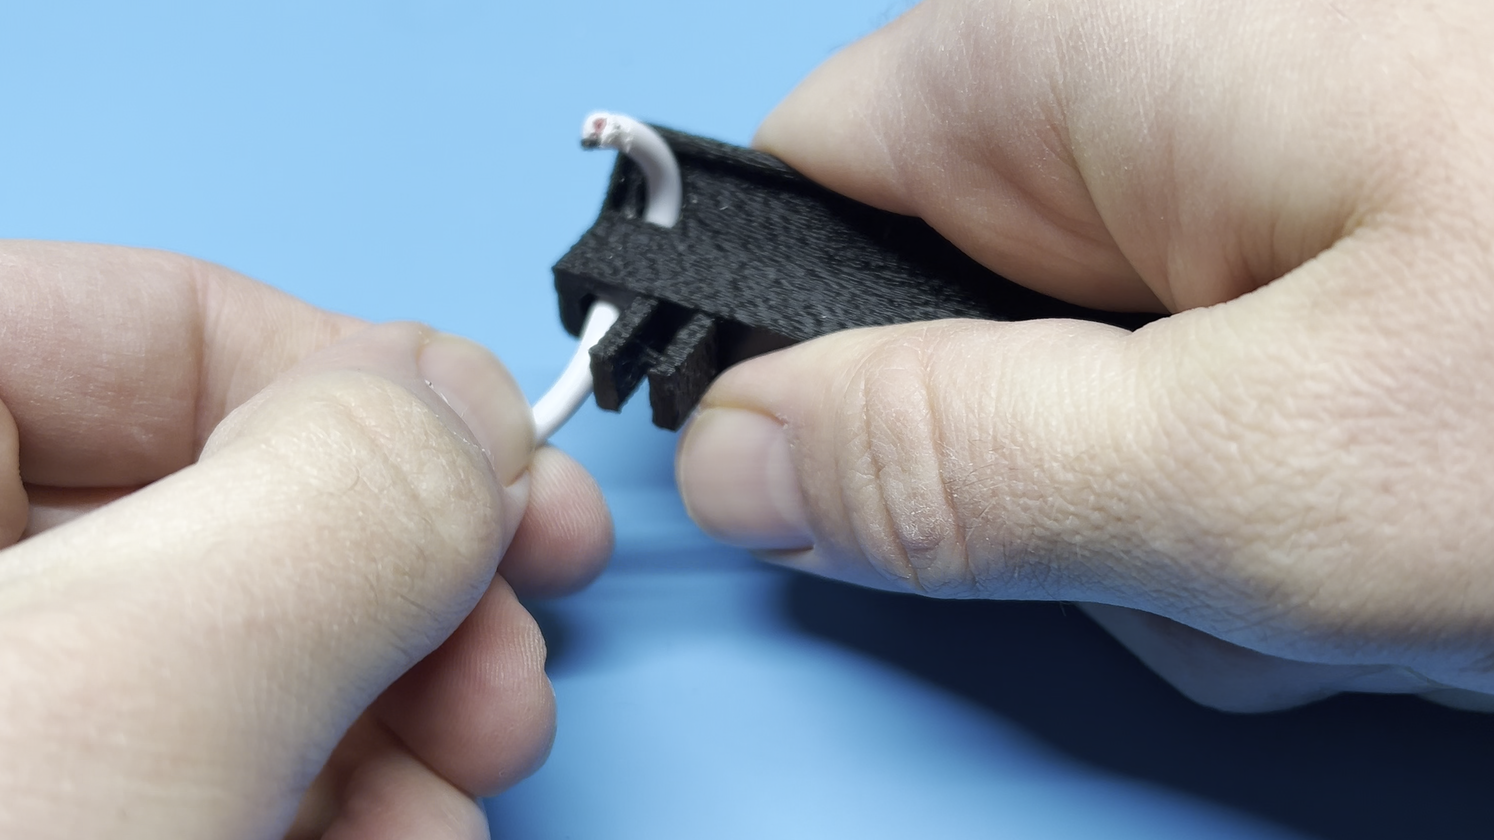
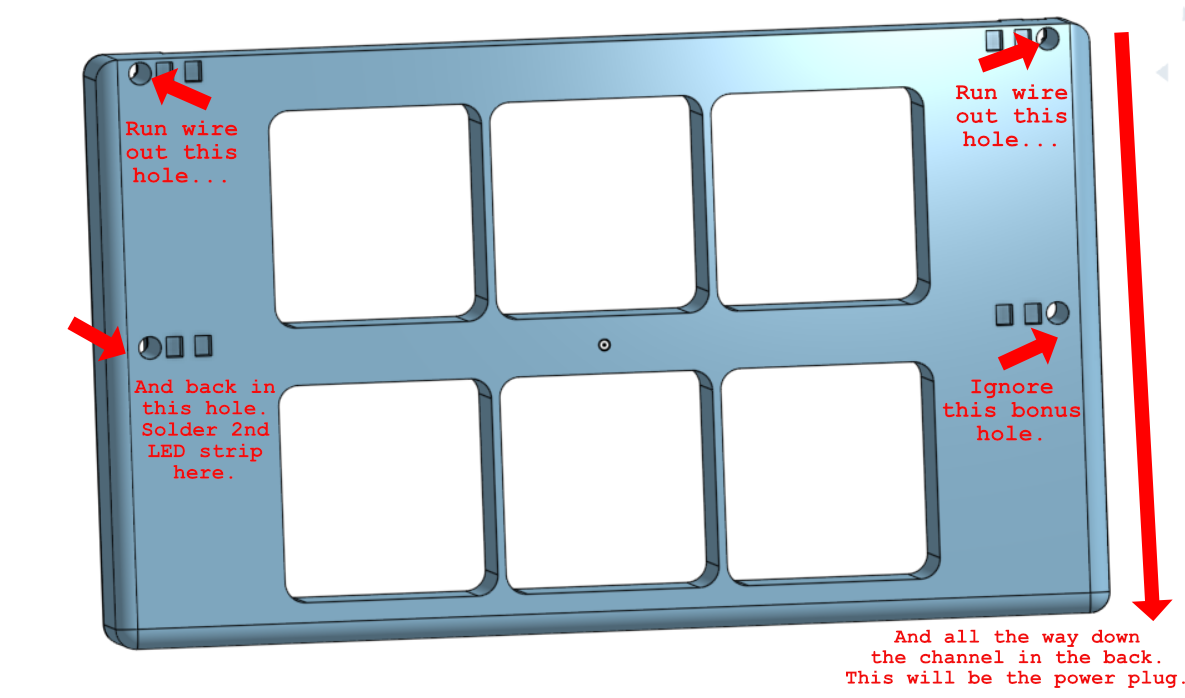
Run wire through both holes in the light stand. This is a bit of a snug fit. I had to pull the wires through with some tweezers.
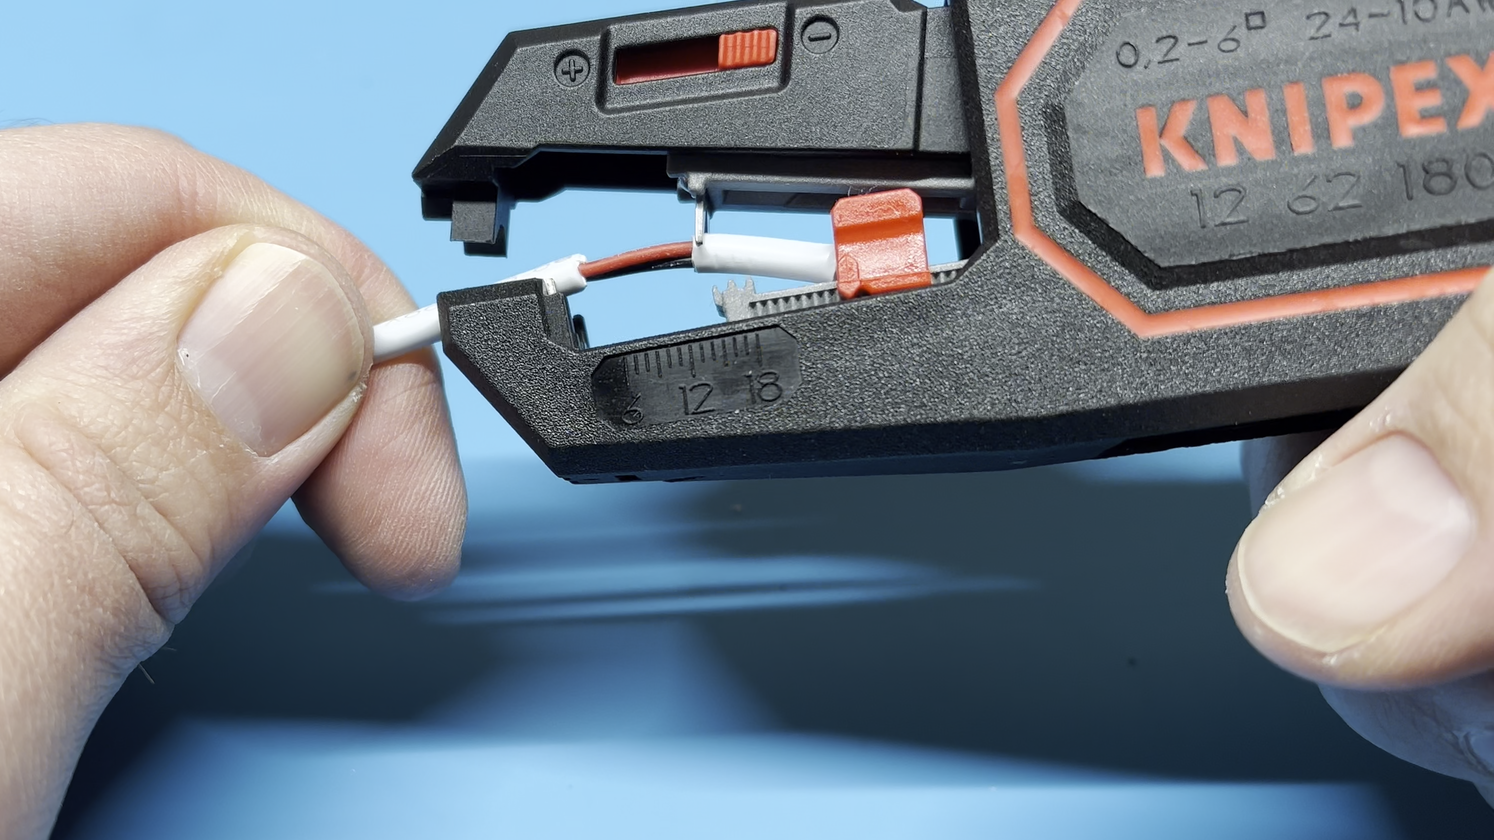
Next you’ll want to strip the wires so you can solder them. I’ll use any opportunity to brag about my Knipex strippers. This is one of the best investments I’ve ever made. (Again, not sponsored. I just love them.)
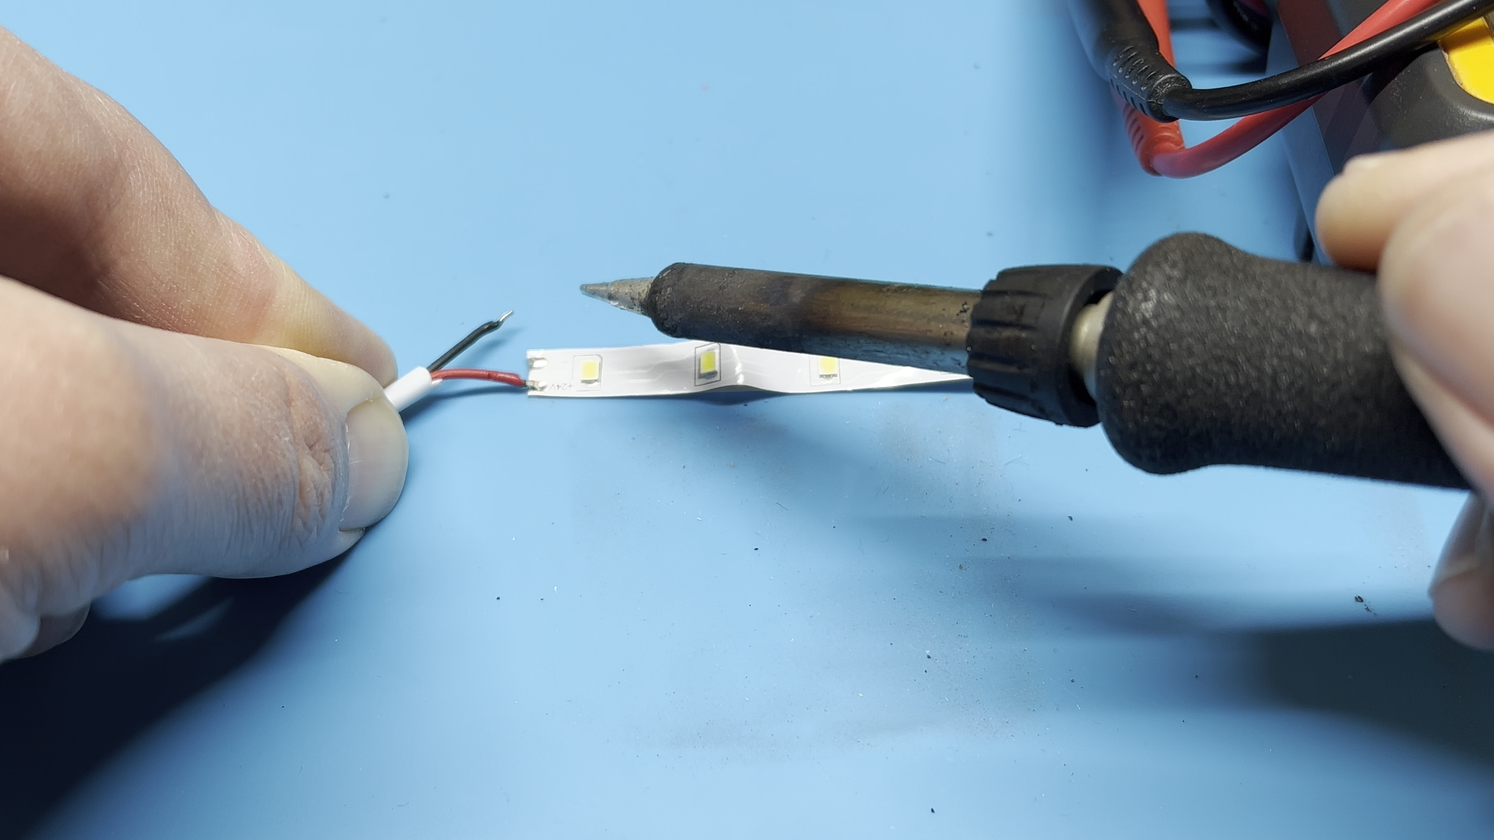
Next, tin the wires by adding a little solder to each one without trying to connect them to anything. Also tin the LED strip by adding some solder to the pads. Once there’s solder on both the LED strip and the wires, place them together and heat them up. The solder will re-melt and complete the join. Once the two sides are connected you may want to add some additional solder if necessary.
Repeat this process on the other end of the LED strip.
You’ll notice that there are wire holes right beside the peg holes on the stand. On the left side (as you’re facing your box) run the wire through it’s hole, down the back of the case, and out the front through the hole below it. This is the wire you’ll use to power the second LED strip.
On the right side, run the wire all the way down the back channel. Leave yourself a bit of excess. This is the wire you’ll use for the barrel jack.
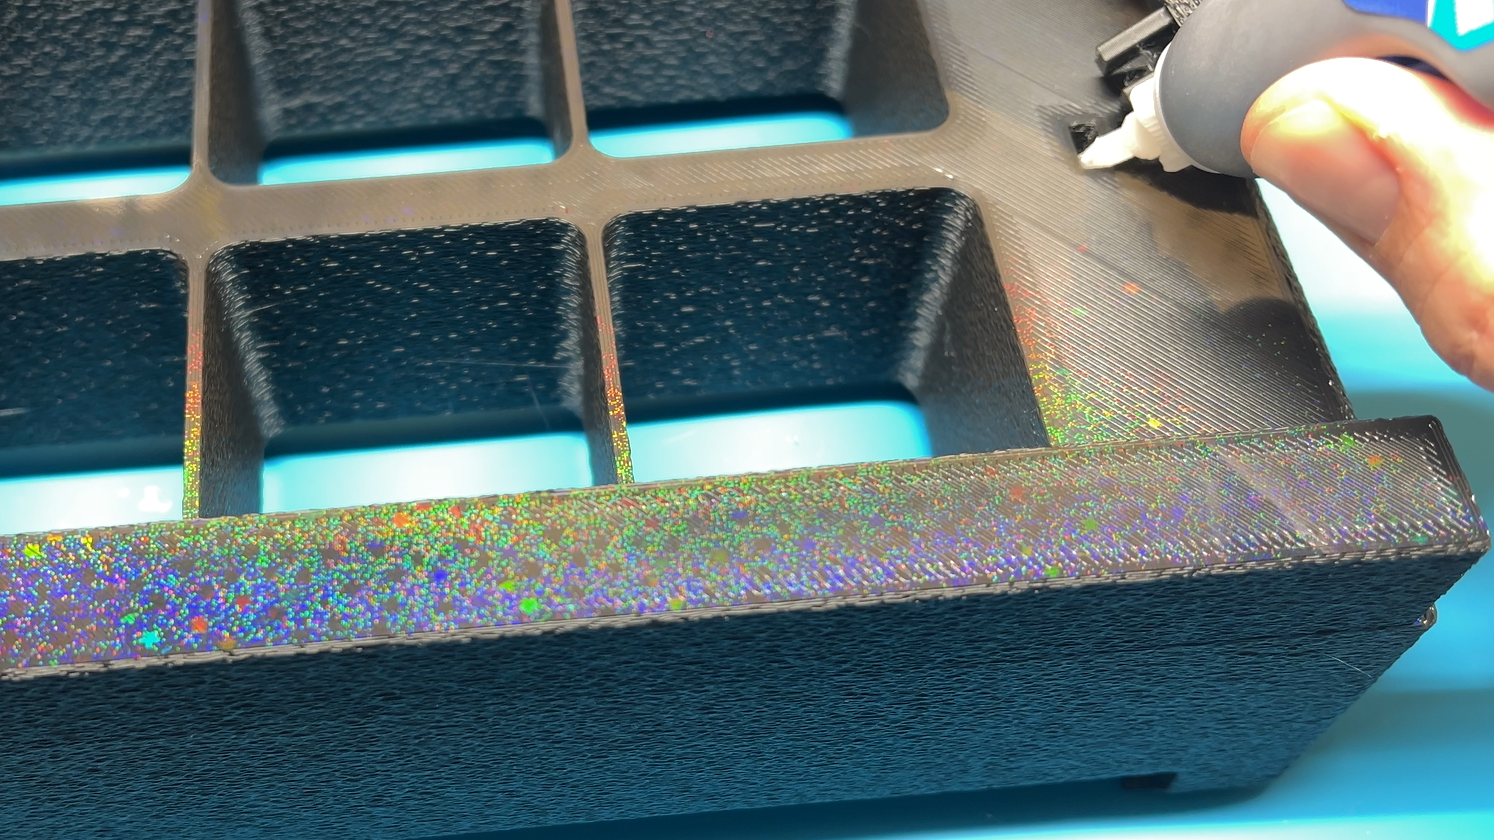
Once the wires are properly routed and soldered, peel the adhesive backing off the LED strip and stick it to the light tray.
Now that the top light is wired up, repeat the process with the bottom light. You only need to solder the left side of the led strip in this case.
Super Glue the Lights In Place
Once you’re confident everything is soldered up correctly, go ahead and place a drop of super glue in each peg hole. Firmly press the lights down for a couple minutes until the super glue has set.
Solder on the Barrel Jack
We’re almost done! The last part is to solder the barrel jack on. Split the wires apart and strip them.
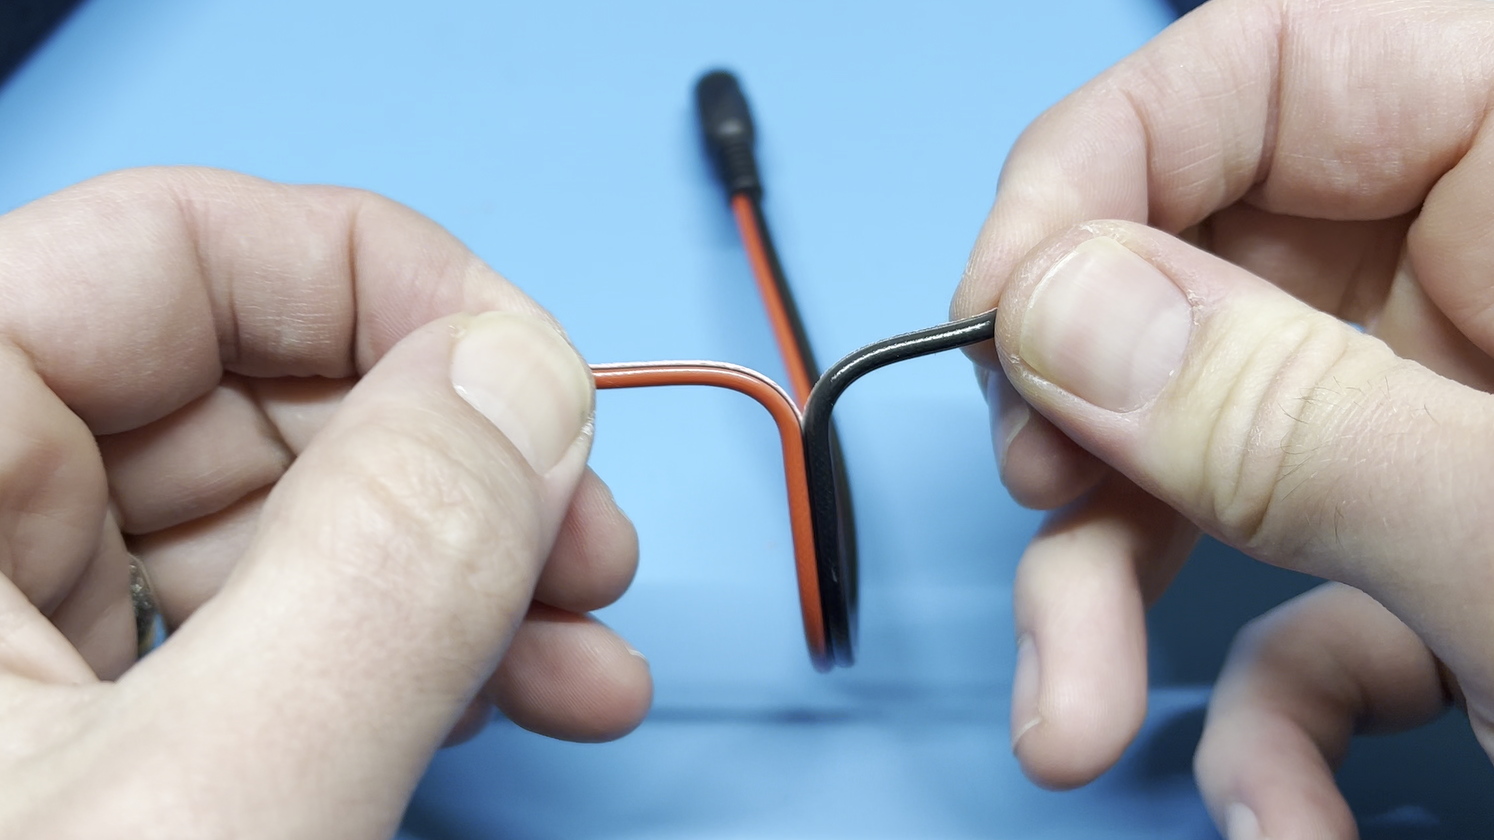
Slide heat shrink tubing on to each wire you’re about to solder. This will prevent the bare wires from touching and creating a short.
Solder the barrel jack wires to the wire leading to your backdrop box. If you need help with soldering the wires together, check out this YouTube video.
Finally, slide the heat shrink tubing over the solder joints and hit it with a hair dryer. The heat shrink tubing will wrap about the joints protecting them.
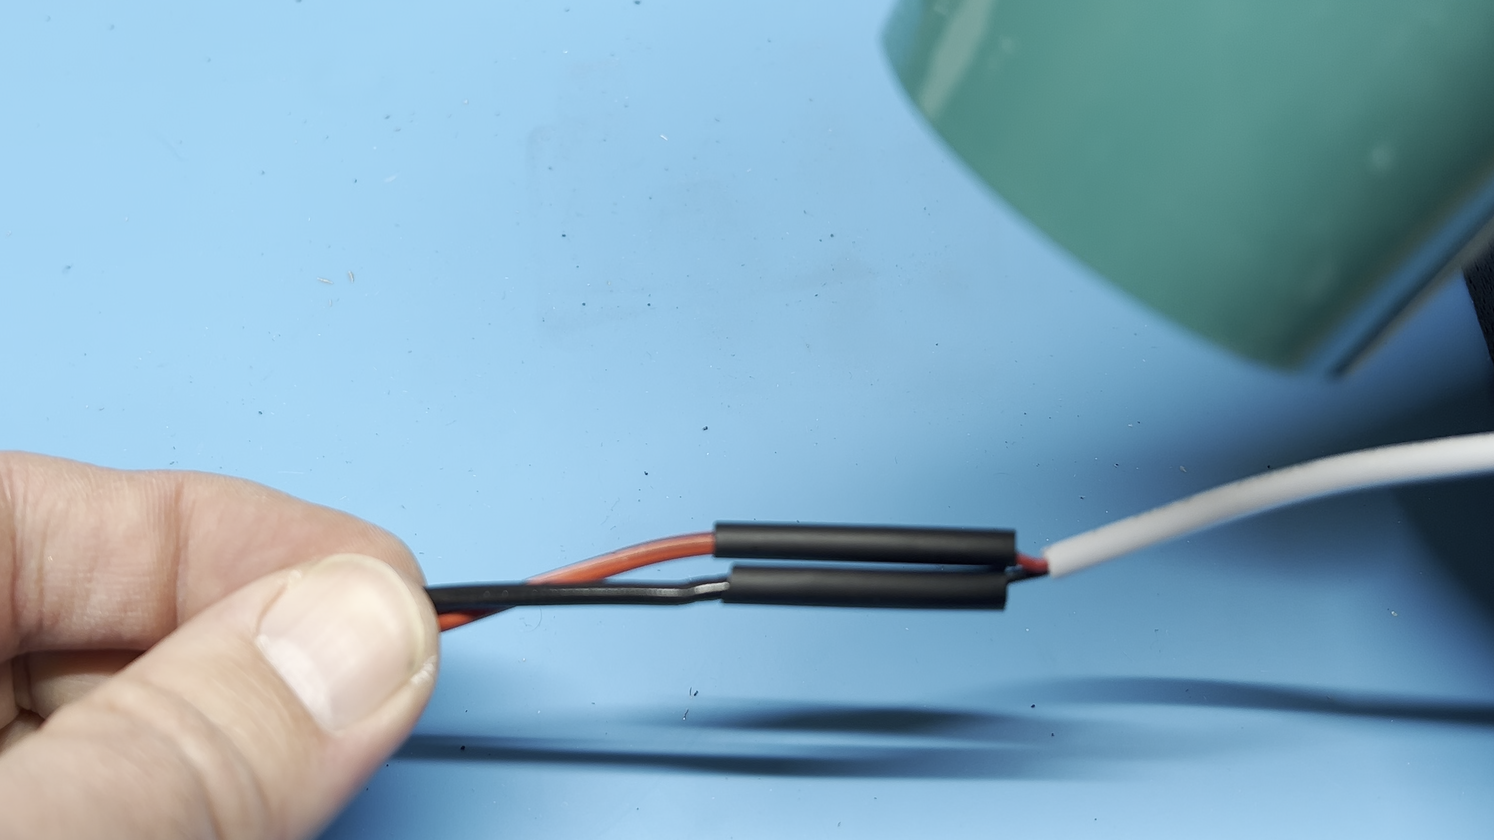
At this point you can be done, but I also put a large piece of heat shrink tubing over the two smaller pieces. I think this makes it look more professional and less like a fire hazard.

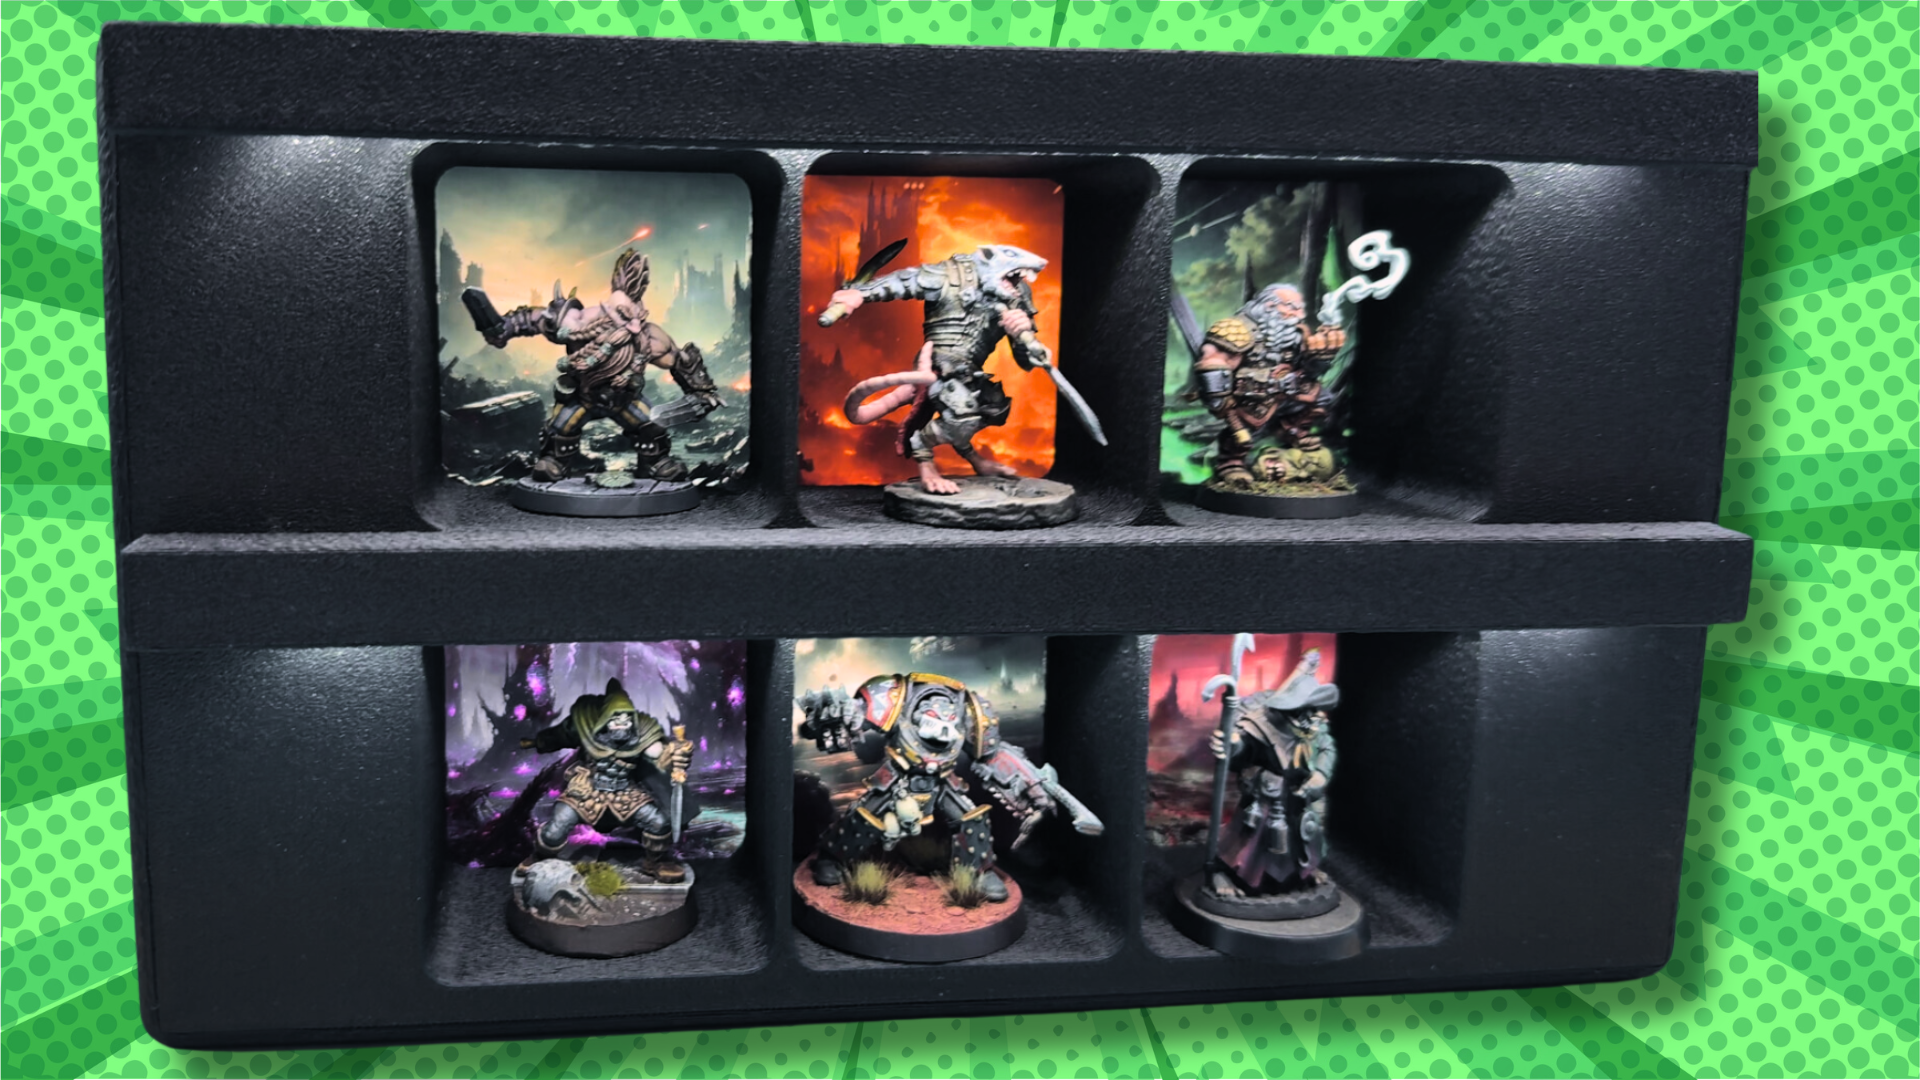
Once you’re done, drop in your tablet and pop in some minis. Your backdrop box is complete!